What is a multi-stop order?
Multi-stop / multi-drop orders are used when a single booking includes multiple pickup points, multiple delivery points, or both.
Before creating a multi-stop order, make sure:
- the Multi Drop add-on has been purchased from the Accounts page
- the Multi Drop option is visible under the Create Order dropdown in the header
- the customer or warehouse is available
- the pickup and delivery addresses are available
- collection and delivery time windows are known
- item details such as content, quantity, weight, and dimensions are ready if needed
Step-by-step: Create a multi-stop order
From the top header, click Create Order and select Multi Drop. This opens the multi-stop booking page.
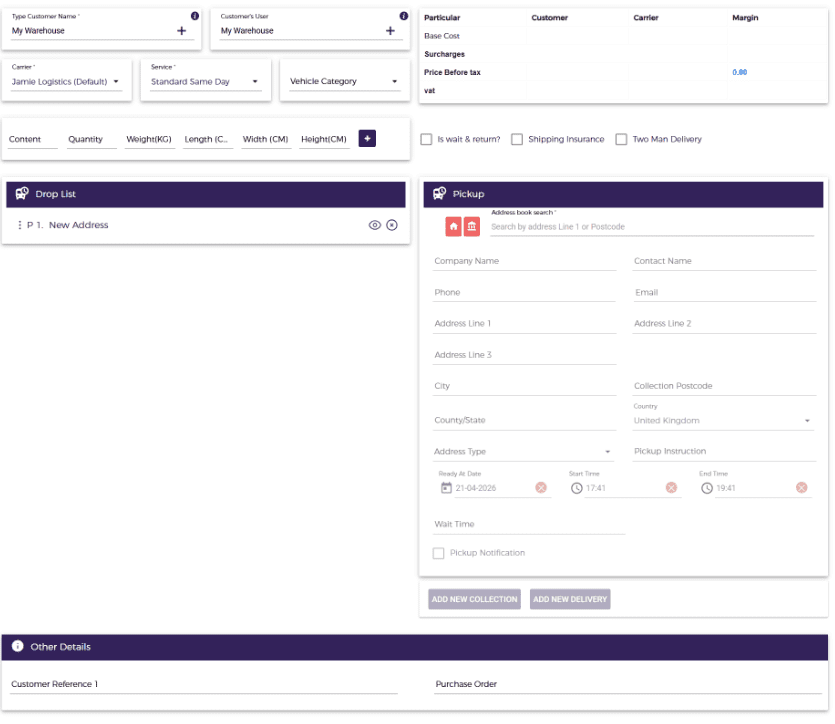
At the top of the page, select:
Customer Name
In the Search Customer section, start typing the customer name. Matching customers will appear in the dropdown. Select the required customer from the list.
Customer’s User
Choose the relevant user under that customer, if applicable.
Use the + icon beside these fields if you need to create a new customer or customer user while making the order.

Choose the following:
Carrier
The carrier or operational entity handling the job.
Service
The service type for the booking, for example Standard Same Day.
Vehicle Category (optional)
Choose the vehicle type if your setup uses vehicle-based pricing or assignment.
When the carrier, service, and vehicle category(optional) are selected, the system fetches the configured rates for that setup. If no rates are configured, the job can still be booked with a default rate of 0.

Use the shipment detail row to enter:
- Content
- Quantity
- Weight (KG)
- Length (CM)
- Width (CM)
- Height (CM)
Click the + button to add the item line.
These details are shown on the route planner and can also help with pricing, planning, driver visibility in the app, vehicle allocation, and route handling.

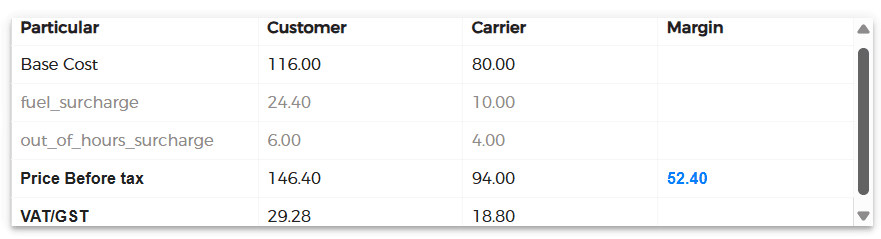
The pricing section shows columns such as:
- Particular
- Customer
- Carrier
- Margin
It can display:
- Base Cost
- Surcharges
- Price Before Tax
- VAT
Depending on your setup, the section may either auto-calculate rates or allow manual updates.
You may see the following options:
Is wait & return?
Select this when the driver needs to wait at the delivery location and bring the parcel or shipment back in return. When selected, a return drop is created automatically in the system using the same address as the first drop, which is the pickup address.Also, this apply wait & Return Surcharge on the order. The surcharge value is configured from the Pricing page, which is a paid add-on. If no surcharge is configured, no extra charge is applied.
Shipping Insurance
Select this to apply the shipping insurance surcharge. The surcharge value is configured from the Pricing page, which is a paid add-on. If no surcharge is configured, no extra charge is applied.
Two Man Delivery
Select this when the order needs an additional person for delivery, such as for sofas, beds, or other heavy items. This applies the Two Man Delivery surcharge if it has been configured in the Pricing page. If no surcharge is configured, no extra charge is applied.
Select these options only when required.

Important rule:
- the first drop should always be Pickup type
- the last drop should always be Delivery type
Start by entering the first stop. To enter the first stop, you can:
- use the Home Address button to auto-fill the customer’s home address
- use the Warehouse Address button to auto-fill the warehouse address
- type the address if it already exists in the Address Book
- use the search option to search the address
- click Click here to enter it manually if the address cannot be found
Fill in all required address and contact fields.

For each stop, enter:
- Ready At Date
- Start Time
- End Time
- Wait Time, if applicable
- Pickup Instruction or Delivery Instruction as required
This ensures the stop has the correct operational window and notes for execution.
To build the multi-stop route, use:
ADD NEW COLLECTION – Adds another pickup point.
ADD NEW DELIVERY – Adds another delivery point.
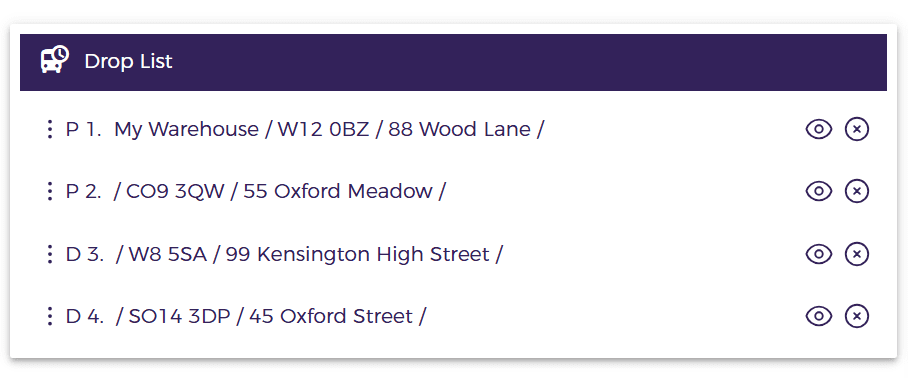
Each stop added is shown in the Drop List and is numbered in sequence, such as:
- P1
- P2
- D1
- D2
This is the main function that allows one order to include multiple pickup and delivery stops.

The Drop List shows all stops in sequence so the user can review the route before booking. From this section, you can:
- view a stop
- drag and drop to change stop order
- delete a stop
Use this section to confirm the final stop sequence before booking the order.
At the bottom of the screen, you can enter:
Customer Reference 1
A customer-side reference for the job.
Purchase Order
PO number or internal billing reference.

There are additional actions available on the top of the screen:
Exchange Address
Exchange the first drop with the last drop.
View Map
Shows the selected drops on the map.
Hand Price
Allows a custom price to be entered manually for the order.
Refresh
Refreshes the grid without refreshing the whole page.
Billing Address
Lets you choose a billing address different from the operational stops specifically for that order. Options include:
- Same As Collection Address
- Same As Delivery Address
- Same As Account Address
- Different Address

After all details are filled in, click Get Rate. This shows the carrier and customer rate based on the pricing setup for the selected service. If no pricing setup exists, it may show 0 as the default rate.
Then click Book Job to create the Multi Drop job in the system.
Quick summary
To create a multi-stop / multi-drop order in InstaDispatch:
- Purchase and enable the Multi Drop add-on.
- Open Create Order > Multi Drop.
- Select the customer, user, carrier, service, and vehicle.
- Add shipment details if required.
- Enter the first stop as a pickup.
- Add more collection and delivery points as needed.
- Review the Drop List and stop order.
- Add references, billing address, and manual price if needed.
Click Get Rate and then Book Job.