When an Admin signs in to InstaDispatch, the default dashboard opens first. This dashboard shows the list of all jobs created in the system and acts as the main working screen for daily order management. From here, users can view orders, search shipments, apply filters, print labels or PODs, export data, and move to other key areas of the platform such as Route Planner, Agents, Customers, Analytics, and Settings. This guide is based on the dashboard details and screenshots you shared.
Main header overview
At the top of the dashboard, the main header gives quick access to the most important controls:

Logo and Home icon
The InstaDispatch logo appears on the top left. Next to it, the Home icon takes the user back to the dashboard from anywhere inside the software.
Branch selector
The branch name is shown in the header. This tells the user which branch they are currently working in.
Route Planner button
The Route Planner button takes the user to the route planning screen. The red count shown beside it displays the number of unassigned jobs from the last 6 weeks and the upcoming 2 weeks. This helps Admins quickly see how many jobs still need planning or allocation.
SMS icon
The SMS icon is used for SMS functionality. Admins can top up SMS credit and use the feature where applicable. SMS cost depends on the destination country and the number of characters in the message. To start using SMS functionality, company owners should contact support..
Notification bell
The bell icon shows the count of new jobs created in the system.
Chat icon
The mobile/chat icon shows the unread chat count. Clicking it opens the chat screen, where Admins can communicate with drivers.
Create Order button
On the far right, the Create Order button allows the Admin to either create a single order or bulk import orders into the system.
Order action bar below the header

Below the main header, the dashboard includes an action bar for searching and managing orders.
Search bar
The search bar allows users to find orders using details such as Tracking Number, Shipment Number, Postcode, City, Drop ID, Parcel ID, or Customer Reference.
Label
The Label button allows users to print labels, waybills, or both. It can also be used for direct printing. Users can apply this to one or multiple selected orders at the same time.
POD
The POD button allows users to generate Proof of Delivery for one or multiple selected orders.
Recurring
The Recurring button is used to create recurring orders based on date and time rules.
Cancel
The Cancel button allows the Admin to cancel one or multiple selected orders.
Export
The Export button is used to download dashboard data.
Reprice
The Reprice button is used to update the weight and price of booked orders in bulk.
Filter
The Filter button helps users search orders using multiple filter options. Users can also save filters, so they can reuse them later without reapplying each filter manually.
Refresh / Reset Grid
The refresh option reloads the grid. Reset Grid returns the table view back to its default state.
Dashboard table overview

The dashboard table is the main section of the screen. It displays the list of jobs/ orders created in the system. By default, the table includes these key columns:
Sr
The serial number of the order row.
Customer
Shows the customer for whom the order was created.
Consignment No / Tracking Number
Displays the consignment number or tracking number for the shipment.
Action
This column includes two main buttons:
- Edit: Opens the complete order details, including tracking events, POD, pricing, scanned items, and other shipment information. It also allows the Admin to edit order details and pricing.
- Copy: Copies shipment details into a new order form so the Admin does not need to enter the full information again. This helps speed up the booking process.
Status
Shows the current order status.
Booking Date
Shows the order booking date.
Pickup
Displays the pickup address.
Delivery
Displays the delivery address.
Collected On
Shows the date the shipment was collected.
Delivered On
Shows the date the shipment was delivered.
Column selector
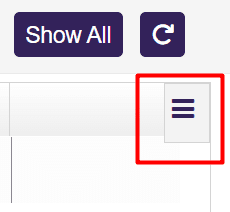
On the far right of the table header, the three-line column icon allows the user to manage visible columns. By selecting or unticking options, the user can choose which columns should appear on the dashboard table. This helps each user customize the grid based on the information they want to see.
Quick filter panel

The filter panel on the right side allows users to search orders using more detailed filter options. Users can filter by fields such as booking date, status, customer, carrier, collected date, delivered date, postcode, requested pickup, requested delivery, recurring, amount, references, route name, driver, and more. Users can then run the search or save the filter for future use. This makes repeated order lookups much faster.
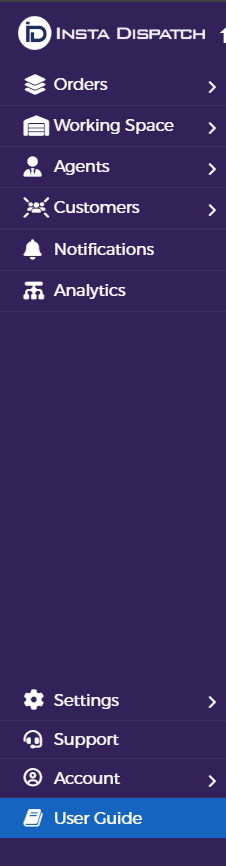
Left sidebar menu
The left sidebar gives access to all default modules in InstaDispatch.
-
Orders
This section includes all order-related options:
Orders Summary
A summary view of order activity.
All Orders
This opens the same main dashboard table explained above.
Assign Orders
Takes the user to the Route Planner screen, where they can plan and assign orders to drivers or agents.
Quotations
Stores quotes created by the customer or Admin. Users can view, download, and convert quotes into orders.
Recurring Log
Allows users to review and manage recurring jobs.
Order Settings
Lets users control booking validations and decide which booking fields should be mandatory or non-mandatory while creating an order.
Order Allocation Settings
These settings apply when assigning orders to agents. Users can create postcode-based routes in the system, which can then be used as filters in the route planner for more efficient route assignment.
Shipment Dashboard Settings
Allows users to decide which columns should be included when exporting order data from the All Orders dashboard.
-
Working Space
This section contains:
Branches
Used to create and manage multiple branches in the system.
Team
Used to create team members and assign roles accordingly.
-
Agents
This section contains:
Agents / Drivers
Used to create or edit drivers in the system.
Vehicle
Used to create or edit vehicles and vehicle categories.
Agents App Settings
Used to manage driver app settings.
-
Customers
This section contains:
Customer List
Used to create or edit customers.
Cost Center
Allows specific customers to be linked with a cost center. Users associated with a cost center can then see only the orders for those cost centers.
Customer Settings
Includes customer portal display settings and company support contact details.
UI Branding
Used to change customer portal colours such as header, sidebar, and button colours.
-
Notifications
Used to enable or disable notifications for different events.
-
Analytics
Contains different reports for analysing drivers, orders, customer profit and loss, and more.
-
Settings
Includes settings such as tracking page settings, printer settings, and portal language options.
-
Support
Used when users need help with a query or want to book a training session.
-
Account
This section includes:
Manage Account
Lets users view account details such as invoices, current plan, and active add-ons.
Access Control
Lets users view default roles, create new roles, and assign users to those roles.
The InstaDispatch Default Dashboard is the main operational screen for Admin users. It shows all jobs created in the system and gives quick access to searching, filtering, editing, copying, printing, exporting, and assigning orders. It also acts as the starting point for accessing other important areas such as Route Planner, Customers, Agents, Analytics, Settings, and Account management.